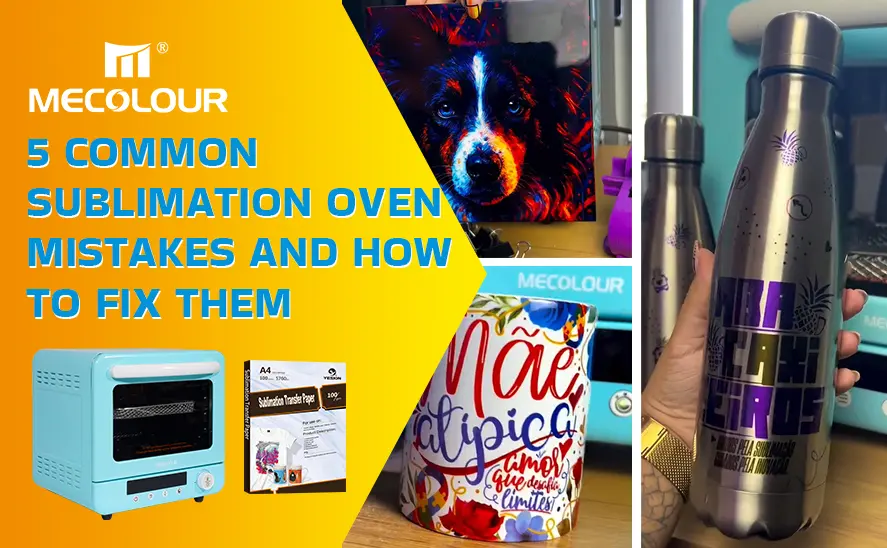
Sublimation printing has become a game-changer in the world of personalized products — especially for tumblers, mugs, and other heat-resistant items. While using a sublimation oven offers even heat distribution and the ability to sublimate multiple items at once, many beginners (and even experienced users) make mistakes that can ruin prints, waste materials, and damage equipment.
In this comprehensive guide, we will uncover the five most common sublimation oven mistakes and provide practical solutions to ensure your next sublimation project turns out flawless every single time.
5 common mistakes when using a sublimation oven
1. Incorrect Temperature and Time Settings
One of the biggest and most common mistakes in sublimation oven printing is using the wrong temperature and time combination. Each substrate — whether it’s a tumbler, mug, or glass — requires specific heat and duration for the ink to properly sublimate into the coating.
The Problem:
When the temperature is too low, the sublimation ink won’t fully transfer, resulting in dull, faded, or patchy colors. On the other hand, if the temperature is too high or the time too long, you’ll see burnt edges, discoloration, or ghosting effects on your print.
How to Fix It:
Check the manufacturer’s instructions for the specific product you are sublimating.
Always preheat your oven before inserting the item to ensure consistent results.
Perform a test print on a scrap item before mass production.
By keeping a sublimation time and temperature log, you can track the best settings for each substrate and avoid repeating costly mistakes.
2. Uneven Heat Distribution Inside the Oven
Not all ovens are created equal. Some convection ovens used for sublimation have hot and cold spots, which cause uneven transfers — one side of your tumbler may look perfect while the other appears faded.
The Problem:
Uneven heating leads to inconsistent color saturation, blurred designs, and incomplete image transfer. This happens because air circulation in some ovens isn’t uniform, especially if you overload it or use the wrong type of wrap.
How to Fix It:
Use a quality convection oven designed for sublimation, not for food. A dedicated oven ensures consistent air circulation and temperature.
Do not overcrowd the oven. Leave space between each tumbler or mug for even heat flow.
Rotate your items halfway through the baking process if your oven’s airflow is uneven.
Consider using a heat thermometer to measure different spots inside the oven and adjust placement accordingly.
For professionals, investing in a dedicated sublimation oven machine with digital control settings ensures long-term consistency and professional-quality results.
3. Poor Wrapping or Tape Application
When sublimating tumblers, mugs, or glass bottles, how you wrap the transfer paper is just as important as your temperature settings. Poor wrapping allows air pockets or gaps to form, leading to blurry lines and uneven colors.
The Problem:
If the sublimation paper isn’t tightly secured, air leaks can cause ghosting, fading, or even double images. Inadequate pressure from the shrink wrap or silicone sleeve means the ink won’t bond properly with the surface.
How to Fix It:
Always ensure your design wraps tightly around the product, with no wrinkles or gaps.
Use high-temperature heat tape to secure the paper firmly, especially along the seam and edges.
For tumblers, use sublimation shrink wraps and heat guns to ensure even compression during the process.
After heating, remove the wrap carefully to prevent scratching the surface.
A perfectly tight wrap ensures sharp, vivid, and seamless prints that look truly professional.
4. Overlooking Surface Preparation
Even the best sublimation designs can fail if the surface of your blank product isn’t clean or properly coated. Oils, dust, or residue can act as barriers between the ink and the surface, preventing proper adhesion.
The Problem:
If your tumbler or mug isn’t thoroughly cleaned before applying the transfer paper, you may see white spots, bubbles, or faded patches after sublimation.
How to Fix It:
Wipe the surface using a lint-free cloth and isopropyl alcohol to remove dust and oils.
Make sure the blank is fully dry before applying the design.
Use only poly-coated or sublimation-ready blanks designed for heat transfer — regular ceramics or metals won’t work properly.
Avoid touching the printing surface with bare hands after cleaning.
Consistent surface preparation is key to achieving clean, vibrant, and durable sublimation results every time.
5. Removing the Transfer Too Early or Too Late
Timing doesn’t end when the oven stops. The moment you remove the product and peel off the sublimation paper also affects your final result.
The Problem:
Removing too early can cause smudging because the ink hasn’t set completely.
Waiting too long allows the paper to stick to the surface, leaving residue or ghost lines.
How to Fix It:
Once your sublimation cycle is finished, carefully remove the item from the oven using heat-resistant gloves.
Let it cool for about 30–60 seconds, then peel the paper slowly while it’s still warm — not hot, not cold.
For best results, place the hot item on a cooling rack to ensure even cooling.
Proper handling post-sublimation helps preserve the crispness and vibrancy of your designs while preventing unwanted marks or fading.
Bonus Tip: Always Use a Dedicated Sublimation Oven
Never use the same oven for food and sublimation. Sublimation ink releases toxic fumes when heated, which can contaminate your food oven and pose health risks. Always invest in a dedicated sublimation convection oven, label it clearly, and keep it for sublimation use only.
Mastering sublimation oven printing takes a bit of practice, but avoiding these five common mistakes can save you time, materials, and frustration. With proper temperature control, even heat distribution, precise wrapping, clean surfaces, and careful timing, you can achieve flawless, professional-quality results every time.